
Is there anything more satisfying than tearing into a crusty, tangy Sourdough Bread Bowl filled with your favorite warm soup or stew? Forget those bland, store-bought versions – making your own Sourdough Bread Bowl at home is easier than you think, and the results are so much better. This guide will walk you through every step, from prepping your starter to serving up a culinary masterpiece. This blog will present all the information that you will ever need about Sourdough Bread Bowls.
Why Make Sourdough Bread Bowls at Home? (The Advantages)
Sure, you could buy a bread bowl, but where’s the fun in that? Making your own offers some serious advantages.
Superior Flavor and Texture Compared to Store-Bought
Homemade sourdough has a depth of flavor and a wonderfully chewy texture that you just can’t find in mass-produced bread bowls. The slow fermentation process develops complex flavors, creating a tangy, slightly sour taste that perfectly complements creamy soups and hearty stews. The crust is crisp and crackly, while the inside is soft and airy.
Customization: Control Over Ingredients and Size
When you make your own Sourdough Bread Bowl, you’re in charge! You can choose the type of flour, adjust the salt level, and even add flavorings like herbs or seeds. Plus, you can make them any size you want – from mini bowls for appetizers to giant bowls for a truly impressive presentation.
The Satisfaction of Creating Something Delicious from Scratch
There’s a unique satisfaction that comes from baking your own bread, especially sourdough. It’s a rewarding process that connects you to the food you’re eating. And let’s be honest, the aroma of freshly baked sourdough filling your kitchen is pretty amazing.
Cost-Effectiveness of Baking Your Own
Making your own bread bowls is often more economical than buying them, especially if you bake regularly. The basic ingredients – flour, water, and salt – are relatively inexpensive.
Essential Ingredients and Equipment for Sourdough Bread Bowls
Let’s gather what we need to get started.
Choosing the Right Flour: Bread Flour vs. All-Purpose
- Bread Flour: This is your best bet for Sourdough Bread Bowls. It has a higher protein content than all-purpose flour, which creates more gluten. Gluten is what gives bread its structure and chewiness, which is essential for a sturdy bread bowl.
- All-Purpose Flour: You can use all-purpose flour, but your bread bowls might be a little less chewy and might not hold their shape as well. If you use all-purpose, you might want to add a little bit of vital wheat gluten to boost the protein content.
The Importance of a Strong, Active Sourdough Starter
Your sourdough starter is the heart of the bread. It’s a living culture of wild yeasts and bacteria that leaven the bread and give it that signature sourdough flavor. A strong, active starter is crucial for a good rise.
- Signs of an active starter: It should be bubbly and doubled in size after feeding. It should also have a pleasant, slightly sour smell.
- The “float test”: Drop a small spoonful of starter into a glass of water. If it floats, it’s ready to use.
Water Quality and Temperature: Impact on Dough
Even water matters!
- Filtered Water: Use filtered water if your tap water has a strong chlorine taste, as this can inhibit yeast activity.
- Temperature: The water temperature affects the fermentation rate. Warmer water speeds up fermentation, while cooler water slows it down. Aim for lukewarm water (around 80-85°F / 27-29°C) for optimal results.
Salt: Enhancing Flavor and Gluten Development
Salt does more than just add flavor. It also controls the yeast activity and strengthens the gluten, contributing to the bread’s structure. Use fine sea salt for the best results.
Essential Tools: Mixing Bowls, Proofing Baskets, Dutch Oven (Optional)
You don’t need a ton of fancy equipment, but these tools are helpful:
- Large Mixing Bowls: For mixing and fermenting the dough.
- Kitchen Scale: For accurate measuring of ingredients (highly recommended for sourdough).
- Dough Scraper: For handling the sticky dough.
- Proofing Baskets (Bannetons): These help shape the bread bowls during the final rise. You can use bowls lined with floured cloth if you don’t have bannetons.
- Dutch Oven (Optional): A Dutch oven creates a steamy environment, which helps the bread rise beautifully and develop a crispy crust. You can bake bread bowls without one, but the results are often better with it.
- Bread Lame A sharp knife to score the bread.
Step-by-Step Guide to Making Sourdough Bread Bowls at Home
Let’s get baking!
Step 1: Preparing Your Sourdough Starter (Feeding and Activation)
About 8-12 hours before you plan to mix your dough, feed your starter. This means discarding a portion of the starter and adding fresh flour and water. The exact ratio depends on your starter, but a common ratio is 1:1:1 (starter:flour: water).
Step 2: Mixing the Dough: Autolyse and Initial Mixing
- Autolyse (Optional but Recommended): In a large bowl, combine the flour and water. Mix until just combined – the dough will be shaggy. Cover and let it rest for 30-60 minutes. This allows the flour to fully hydrate, resulting in a more extensible dough.
- Add the Starter and Salt: After the autolyse, add the active starter and salt to the dough. Mix thoroughly until everything is well combined.
Step 3: Bulk Fermentation: Developing Flavor and Strength
- Stretch and Folds: Over the next 2-3 hours, perform a series of “stretch and folds” every 30-45 minutes. To do this, grab a portion of the dough, stretch it upwards, and fold it over onto itself. Rotate the bowl and repeat this process until you’ve stretched and folded all sides of the dough. This helps develop the gluten and strength of the dough.
- Rest: Between stretch and folds, let the dough rest, covered, in a warm place (ideally around 75-80°F / 24-27°C). The dough should increase in volume and become bubbly.
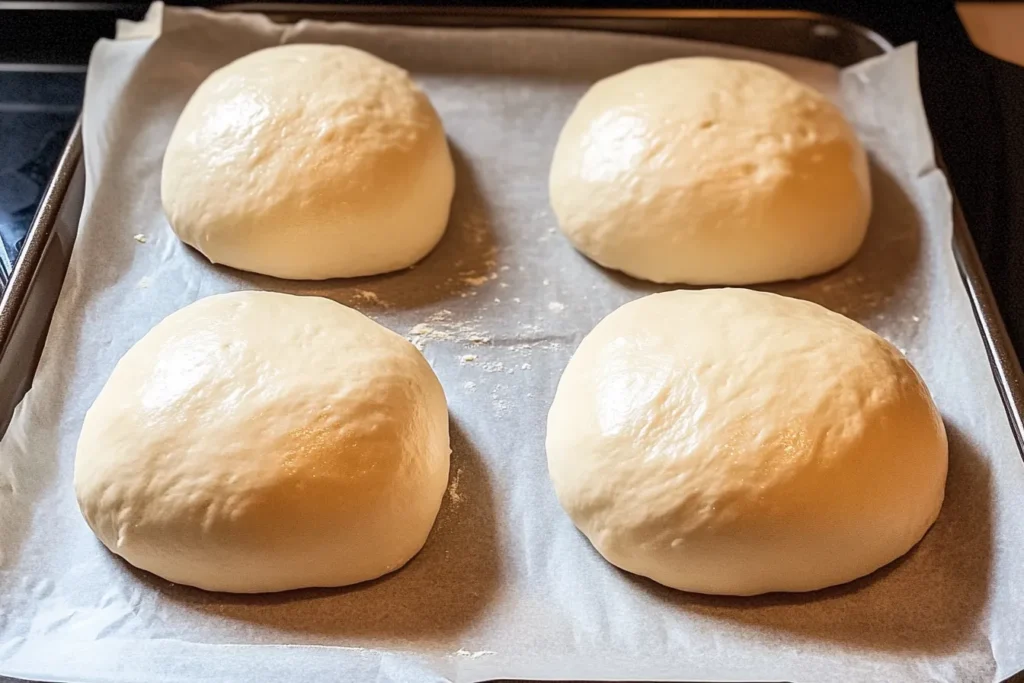
Step 4: Shaping Your Sourdough Bread Bowls: Creating the Round Shape
- Divide the Dough: Gently turn the dough out onto a lightly floured surface. Divide it into the desired number of portions (depending on how large you want your bread bowls).
- Shape into Rounds: Shape each portion into a tight round. You can do this by gently pulling the edges of the dough towards the center and then flipping it over and using your hands to create surface tension.
Step 5: Proofing: Allowing the Dough to Rise Properly
- Place in Proofing Baskets: Place the shaped rounds, seam-side up, in well-floured proofing baskets (or bowls lined with floured cloth).
- Cold Retard (Optional but Recommended): Cover the baskets and refrigerate them overnight (or for up to 24 hours). This slow, cold fermentation develops the flavor and makes the dough easier to handle.
Step 6: Baking Your Sourdough Bread Bowls: Achieving a Crispy Crust
- Preheat: Preheat your oven to 450°F (232°C) with your Dutch oven inside (if using).
- Score the bread
Baking with a Dutch Oven: Creating Steam for a Better Rise
- Carefully remove the hot Dutch oven.
- Gently invert one of the bread bowls into the Dutch oven.
- Score the top of the loaf with a bread lame or a sharp knife. This helps control how the bread expands during baking.
- Cover the Dutch oven and bake for 20 minutes.
- Remove the lid and bake for another 20-25 minutes, or until the crust is deeply golden brown and the internal temperature reaches 200-210°F (93-99°C).
Baking Without a Dutch Oven: Alternative Methods
- Preheat a baking stone or baking sheet in the oven.
- Place the bread bowls on the hot stone or sheet.
- Create steam: You can do this by placing a pan of hot water on the bottom rack of the oven, or by spraying the oven walls with water several times during the first few minutes of baking.
- Bake at 450°F (232°C) for about 30-40 minutes, or until golden brown and the internal temperature reaches 200-210°F (93-99°C).
Step 7: Cooling and Cutting Your Bread Bowls
- Cool Completely: Let the bread bowls cool completely on a wire rack before cutting and serving. This is crucial for the texture!
- Cut the top.
- Scoop the bread inside to make space for the soup.
Troubleshooting Common Sourdough Bread Bowl Problems
Let’s address some common issues.
My Bread Bowls are Flat: Why Didn’t They Rise?
- Inactive Starter: Make sure your starter is active and bubbly before using it.
- Not Enough Bulk Fermentation Time: Sourdough needs time to rise. Be patient!
- Too Cold of an Environment: Sourdough prefers a warm environment.
- Over-Proofing: If the dough over-proofs, it can collapse during baking.
My Bread Bowls are Too Dense: Achieving a Lighter Texture
- Under-Proofing: Make sure the dough has risen sufficiently during both the bulk fermentation and the final proofing.
- Not Enough Water: Sourdough needs relatively high hydration (water content) for a light, airy texture.
- Too Much Flour: Be careful not to add too much flour during shaping.
My Bread Bowls are Soggy on the Bottom: Prevention Techniques
- Bake Thoroughly: Make sure the bread bowls are fully baked.
- Cool Completely: Let them cool completely before filling them with soup.
- Use a Thick Soup: Thinner soups are more likely to soak through the bread.
- Don’t Fill Too Far in Advance: Fill the bread bowls just before serving.
- Brush with butter: Brush melted butter on the inner part of the bowl before adding the filling.
My Crust Isn’t Crispy Enough: Achieving a Golden-Brown Crust
- Steam: Steam is essential for a crispy crust. Use a Dutch oven if possible, or create steam using one of the methods described above.
- High Temperature: Baking at a high temperature helps create a crispy crust.
- Longer Baking Time: Don’t be afraid to bake the bread bowls a little longer if needed.
Serving Your Homemade Sourdough Bread Bowls
Now for the best part – enjoying your creation!
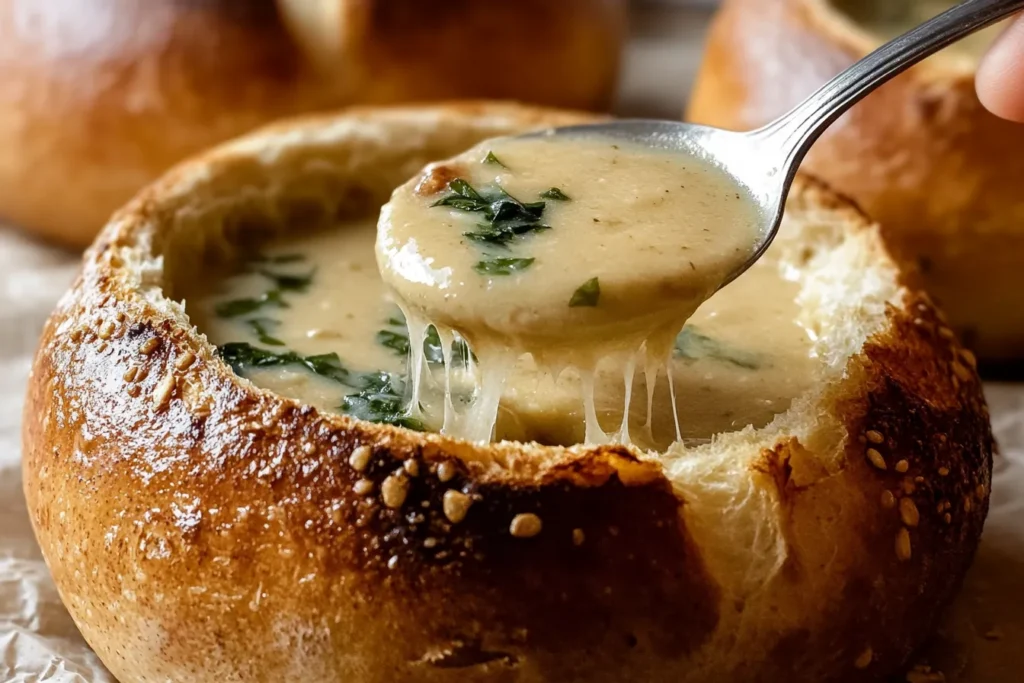
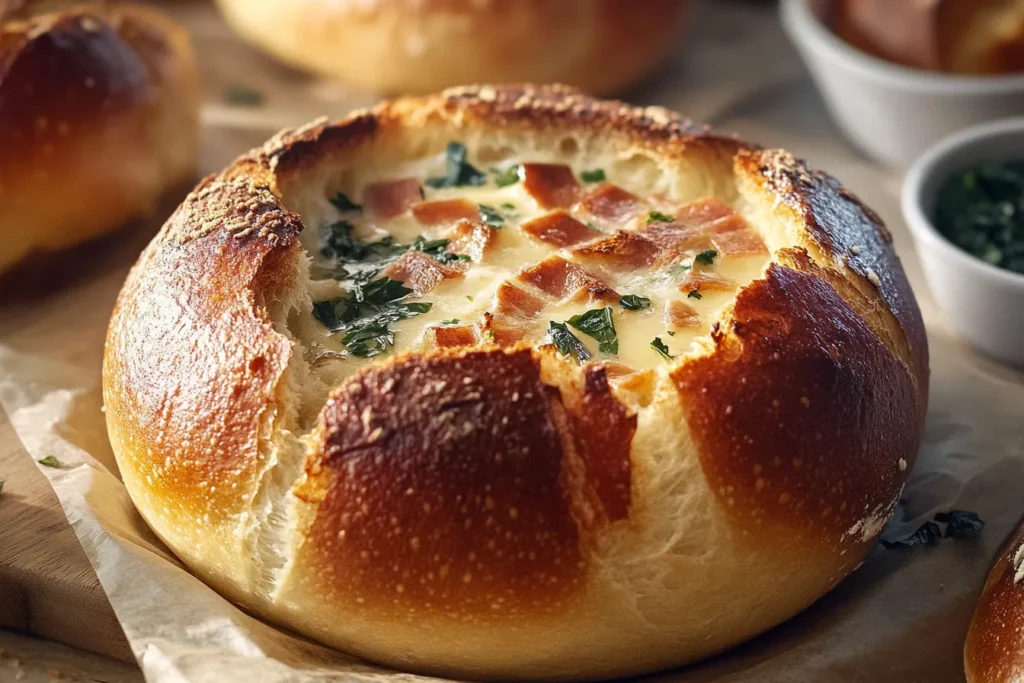
Cutting the Lid and Hollowing Out the Bowl
Use a serrated knife to cut a circle around the top of the bread bowl, creating a lid. Then, use a spoon or your fingers to carefully hollow out the inside, leaving a shell about 1 inch thick.
Best Soups to Serve in Sourdough Bread Bowls
Classic Creamy Soups: Clam Chowder, Broccoli Cheddar
These are classic pairings for a reason! The creamy texture and rich flavors complement the sourdough perfectly.
Hearty Stews and Chilis
A hearty beef stew or chili is another great option. The bread bowl soaks up the delicious juices, making for a satisfying and filling meal.
Other Creative Filling Ideas (Dips, Salads)
Don’t limit yourself to soup! Sourdough Bread Bowls are also great for:
- Spinach and Artichoke Dip
- Hot Crab Dip
- Caesar Salad
- Pasta Salad
How big should a sourdough bread bowl be
The size is up to you! A good average size is about 4-6 inches in diameter. This will hold a generous serving of soup without being too overwhelming.
Frequently Asked Questions (FAQs) about Sourdough Bread Bowls
Let’s answer some common questions.
Can I Use All-Purpose Flour Instead of Bread Flour?
Yes, you can, but bread flour is recommended for the best results (see explanation above).
How Do I Store Leftover Sourdough Bread Bowls?
Store leftover bread bowls at room temperature in a paper bag or bread box for up to 2 days. You can also freeze them for longer storage.
Can I Freeze Sourdough Bread Bowls?
Yes! Wrap them tightly in plastic wrap and then place them in a freezer bag. They will keep for up to 3 months. Thaw them at room temperature before serving.
How Long Does the Entire Process Take?
Sourdough takes time, but most of it is hands-off. The active time (mixing, shaping) is relatively short, but the fermentation and proofing times can be several hours or even overnight. Plan accordingly!
How Do I Know When My Starter is Ready to Use?
See the “float test” explanation above in the “Importance of a Strong, Active Sourdough Starter” section.
Adapting the recipe
Let’s learn how to adapt the recipe.
How to make mini sourdough bread bowls
To make mini sourdough bread bowls, simply divide the dough into smaller portions during shaping. You’ll need to adjust the baking time accordingly – start checking for doneness around 15-20 minutes.
How to make sourdough bread bowls without a Dutch oven
You can still achieve a crispy crust without a Dutch oven. Use a baking stone and add steam (see explanation above).
There you have it – everything you need to know to make amazing Sourdough Bread Bowls at home! It might seem like a lot of information but don’t be intimidated. Take it one step at a time, and enjoy the process. The reward of a warm, crusty, homemade bread bowl filled with your favorite soup is well worth the effort. Happy baking! Now go ahead and impress your friends and family with your newfound sourdough skills!